Introduction
If you’re looking for a dessert that embodies the warmth of summer while offering a refreshing taste, look no further than the Tropical Bliss: No Bake Pineapple Cream Dessert. This delightful treat is a celebration of tropical flavors, primarily featuring the vibrant taste of pineapple, which brings a sunny disposition to your dessert table. With its creamy texture and sweet, tangy notes, this dessert is perfect for satisfying your sweet tooth without heating up the kitchen.
The appeal of this no-bake dessert lies not only in its luscious taste but also in its effortless preparation. In just a few simple steps, you can create an indulgent treat that feels gourmet but is accessible to home cooks of all skill levels. This dessert shines at summer gatherings, family barbecues, or any occasion where you want to impress your guests without spending hours fussing over a hot oven. Its versatility makes it suitable for parties, picnics, or even a simple weeknight treat. Whether you’re serving it at a birthday celebration or enjoying it as a sweet ending to a casual dinner, the Pineapple Cream Dessert will undoubtedly be a hit.
Understanding the Ingredients
To craft this delightful no-bake dessert, you need to understand the key ingredients and their roles in creating that perfect blend of flavors and textures. Each component contributes to the overall experience, ensuring that your dessert is not only delicious but also visually appealing.
Crushed Pineapple
At the heart of this dessert is crushed pineapple, which brings a tropical sweetness and juicy texture that is both refreshing and indulgent. Pineapple provides a vibrant flavor that balances perfectly with the creamy components of the dessert. When using canned crushed pineapple, be sure to drain it well to prevent excess moisture from making the dessert soggy. Fresh pineapple can also be used for a more natural flavor, but it requires a bit more preparation. The pineapple not only enhances the flavor profile but also adds a beautiful golden hue to the cream mixture, making the dessert visually appealing.
Heavy Whipping Cream
Heavy whipping cream is a crucial ingredient in this recipe, as it contributes to the dessert’s lightness and creaminess. When whipped, this cream transforms into a fluffy texture that creates a cloud-like sensation in every bite. The key to achieving the perfect whipped cream is to use cold heavy cream and to whip it until it forms stiff peaks. This step is essential because it helps to provide structure to the dessert, ensuring that it holds its shape when served. The richness of the cream complements the sweetness of the pineapple, resulting in a delightful combination that is hard to resist.
Cream Cheese
Cream cheese is another vital component, adding richness and stability to the dessert. Its creamy texture and mild flavor help to bind the other ingredients together, creating a smooth and cohesive mixture. When softened and blended with the other components, cream cheese contributes to the overall creaminess of the dessert while also preventing it from becoming too sweet. It balances the flavors and adds a hint of tang that contrasts beautifully with the sweetness of the crushed pineapple.
Powdered Sugar
Powdered sugar is used in this recipe primarily for sweetness and to create a smooth texture. Unlike granulated sugar, powdered sugar dissolves easily, ensuring that the dessert has a silky finish without any graininess. The amount of powdered sugar can be adjusted based on your taste preference; if you prefer a less sweet dessert, feel free to reduce the quantity. It’s essential to mix the powdered sugar thoroughly with the cream cheese to achieve a uniform sweetness throughout the dessert.
Graham Crackers
The base of this dessert is made from crushed graham crackers, which provide a crunchy texture and a hint of sweetness. The graham cracker crust serves as a sturdy foundation for the creamy filling while adding a delightful contrast in texture. When combined with melted unsalted butter, the graham crackers bind together to form a firm crust that holds its shape when sliced. This simple yet effective base elevates the dessert, giving it a classic feel reminiscent of traditional cheesecake crusts.
Unsalted Butter
Unsalted butter is used to bind the crust ingredients together effectively. By adding melted butter to the crushed graham crackers, you create a mixture that can be pressed into a pan, forming a firm and flavorful base. Using unsalted butter allows you to control the saltiness of the dessert, ensuring that the sweet flavors shine through without distraction. The butter also contributes to the richness of the crust, enhancing the overall flavor profile of the dessert.
Shredded Coconut (Optional)
For those looking to amplify the tropical experience, shredded coconut can be added as an optional ingredient. Coconut complements the flavors of pineapple beautifully, enhancing the overall tropical vibe of the dessert. You can mix it into the cream filling or sprinkle it on top as a garnish for added texture and visual appeal. Whether you choose to include it or not, shredded coconut can elevate the dessert and bring an extra layer of flavor.
Step-by-Step Instructions
Now that we’ve covered the essential ingredients, let’s dive into the step-by-step instructions for preparing the Tropical Bliss: No Bake Pineapple Cream Dessert. This process is simple and straightforward, allowing you to focus on creating a delicious treat that your family and friends will love.
Preparing the Crust
1. Crush the Graham Crackers: Start by placing the graham crackers in a resealable plastic bag and using a rolling pin to crush them into fine crumbs. Alternatively, you can use a food processor for a quicker method. Aim for a texture similar to sand, as this will help create a firm crust.
2. Melt the Butter: In a small saucepan or microwave, melt the unsalted butter until completely liquid. Allow it to cool slightly before adding it to the graham cracker crumbs.
3. Combine Ingredients: In a mixing bowl, combine the crushed graham crackers and melted butter. Stir until the crumbs are evenly coated and the mixture resembles wet sand.
4. Press Into the Pan: Transfer the graham cracker mixture into a 9-inch springform pan or a pie dish. Use the back of a measuring cup or your fingers to press the mixture firmly into the bottom and up the sides of the pan. This step is crucial for achieving a stable crust, so be sure to pack it tightly.
5. Chill the Crust: Place the crust in the refrigerator for about 15-20 minutes to set while you prepare the cream filling. This chilling time helps the butter solidify, ensuring that the crust maintains its shape when the dessert is assembled.
Making the Cream Mixture
1. Prepare the Cream Cheese: In a medium mixing bowl, allow the cream cheese to sit at room temperature for about 10-15 minutes to soften. This will make it easier to mix and ensure a smooth consistency.
2. Mix the Cream Cheese and Sugar: Using an electric mixer or a hand whisk, beat the softened cream cheese until smooth and creamy. Gradually add the powdered sugar, mixing well until fully incorporated. The mixture should be free of lumps and have a silky texture.
3. Incorporate the Crushed Pineapple: Gently fold in the drained crushed pineapple into the cream cheese mixture. Be cautious not to overmix, as this could deflate the mixture. The goal is to retain the airiness while evenly distributing the pineapple throughout.
Whipping the Cream
1. Whip the Heavy Cream: In a separate mixing bowl, pour in the cold heavy whipping cream. Using an electric mixer, beat the cream on medium-high speed until it starts to thicken. This usually takes about 2-3 minutes.
2. Achieving Stiff Peaks: As you continue to whip, gradually increase the speed to high. Whip the cream until it forms stiff peaks, meaning that when you lift the beaters, the peaks stand tall without collapsing. This step is crucial for the light and airy texture of the dessert.
Combining Ingredients
1. Folding the Cream: Once the whipped cream has reached the stiff peak stage, gently fold it into the cream cheese and pineapple mixture. Use a rubber spatula to carefully mix the two components together, ensuring you maintain as much air as possible. This will keep the dessert light and fluffy.
2. Final Mix: Continue folding until the mixture is fully combined and there are no visible streaks of whipped cream or cream cheese. Be patient and work slowly to ensure the texture remains airy.
3. Transfer to the Crust: Once the cream mixture is well combined, pour it into the prepared graham cracker crust. Use a spatula to smooth the top, creating an even surface for presentation.
This marks the completion of the preparation steps. Your Tropical Bliss: No Bake Pineapple Cream Dessert is close to being ready for the refrigerator, where it will set and develop its flavors. Stay tuned for more about the chilling process, serving suggestions, and tips to make this dessert a standout at any occasion!
Layering the Dessert
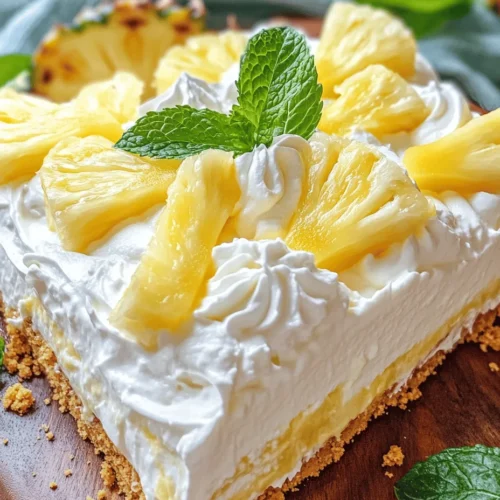
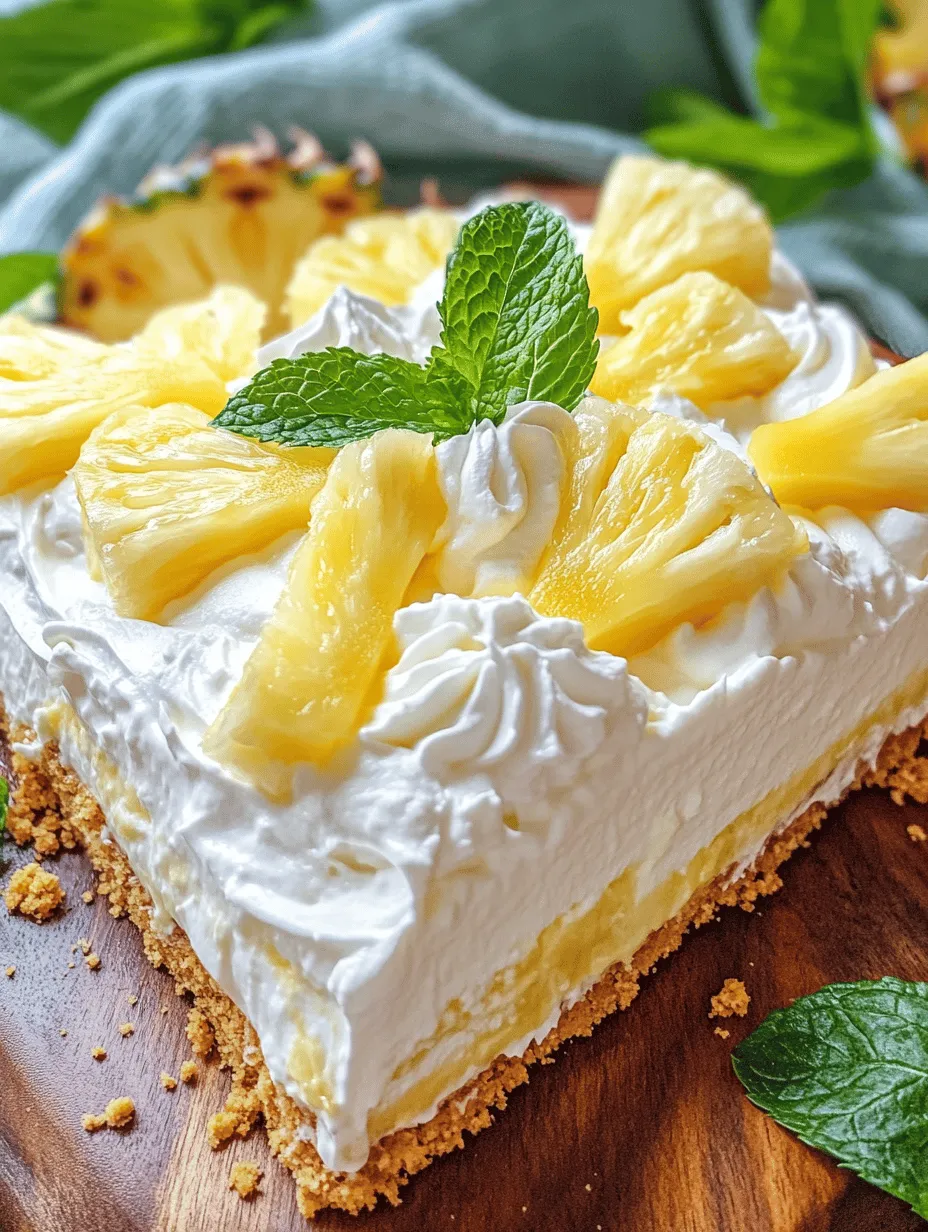
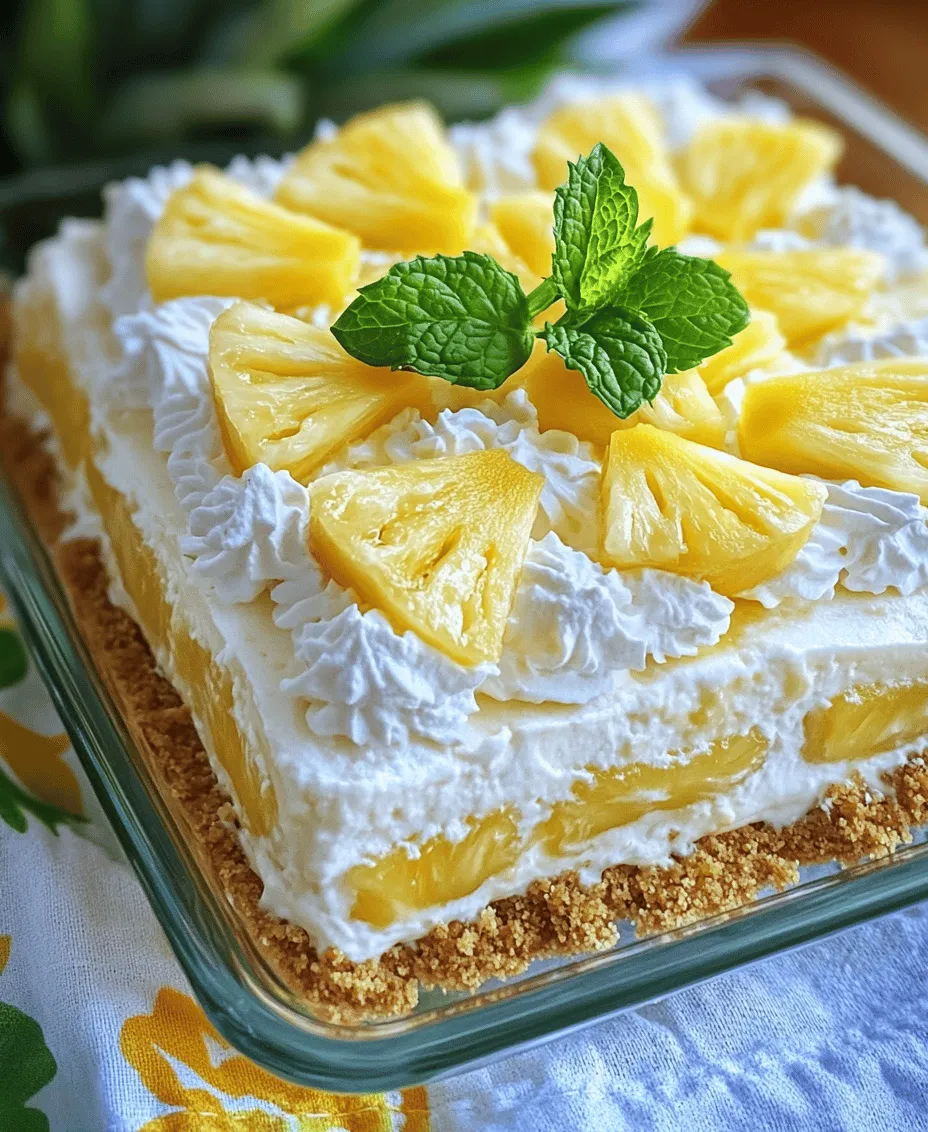
Layering is a crucial aspect of assembling your Tropical Bliss: No Bake Pineapple Cream Dessert. Not only does it enhance the aesthetic appeal, but it also ensures that every spoonful delivers a harmonious blend of flavors. To achieve an even distribution, start by using a clear glass dish or individual dessert cups. This way, guests can admire the beautiful layers of creamy filling, crushed pineapple, and crunchy crust.
Begin by spooning a layer of the creamy filling into the bottom of your dish, smoothing it out evenly with a spatula. Next, add a layer of crushed pineapple, making sure to spread it evenly across the filling. Then, sprinkle a layer of your prepared crust, whether it’s made from crushed graham crackers or a gluten-free alternative. Repeat these layers until you reach the top of your dish, finishing with a layer of the cream. This careful layering not only adds visual interest but also allows your guests to experience the delightful interplay of textures with each bite.
Chilling: Significance of Refrigeration for Texture Development
Once your dessert is layered, it’s time for the most important step: chilling. Refrigerating your Tropical Bliss dessert for at least four hours (or overnight if possible) allows the flavors to meld and the textures to develop significantly. Chilling helps the creamy filling firm up, making it easier to slice or scoop, and ensures that the crust maintains its crunchiness against the moist filling.
During refrigeration, the flavors deepen, and the sweetness of the pineapple infuses into the cream, resulting in a dessert that is not only refreshing but also incredibly satisfying. The contrast between the cool cream and the juicy pineapple creates a delightful experience that perfectly complements the tropical theme.
Flavor Profiles and Texture
The Tropical Bliss dessert boasts a medley of tropical flavors, primarily driven by the star ingredient: pineapple. Known for its sweet yet tangy profile, pineapple elevates this dessert beyond the ordinary. The cream cheese and whipped cream contribute to a lush, velvety texture that balances the fruit’s acidity beautifully.
When you dig into the dessert, you’ll encounter a delightful contrast of textures. The creamy filling envelops the smooth pineapple pieces, while the crunchy crust adds a satisfying bite. This combination creates a multi-layered sensory experience, making each mouthful a unique adventure.
The chilling process enhances these flavors and textures, allowing the ingredients to interact fully. The coolness of the dessert makes it refreshing, perfect for warm weather or after a hearty meal, leaving a lingering tropical taste that transports you to a sunny beach.
Serving Suggestions and Presentation Ideas
Presenting your Tropical Bliss dessert in an appealing way can elevate the dining experience. Here are some creative serving options:
– Individual Cups: Serve the dessert in clear cups or jars for a personal touch. Layer the ingredients as described, and top each cup with a dollop of whipped cream and a slice of fresh pineapple. This not only looks beautiful but also makes it easy for guests to enjoy their portion.
– Parfaits: Create parfaits by layering the ingredients in tall glasses. This allows for striking visibility of the layers and can be a fun way to showcase the dessert at parties or gatherings.
– Garnishing Ideas: Fresh garnishes can enhance both the flavor and presentation. Consider topping each serving with a sprig of mint for a pop of color and freshness, or sprinkle some toasted coconut flakes over the top for added crunch.
– Seasonal Variations: Don’t hesitate to experiment with seasonal fruits. Adding mango or kiwi can provide additional tropical flavors and a splash of color. You can also consider incorporating passion fruit for a tangy twist or even berries for a contrasting sweetness.
Nutritional Information and Dietary Considerations
Understanding the nutritional value of your dessert can be helpful, especially if you’re serving it to guests with dietary restrictions. Here’s a general breakdown of the nutritional value per serving (based on an 8-serving recipe):
– Calories: Approximately 250
– Fat: 15g
– Carbohydrates: 30g
– Protein: 3g
– Fiber: 1g
– Sugar: 15g
For those with dietary restrictions, consider using gluten-free graham crackers or almond flour to create the crust, making this dessert suitable for gluten-sensitive individuals. Additionally, you can substitute the cream cheese with a dairy-free alternative to cater to vegan diets, ensuring that everyone can enjoy this tropical treat.
The Cultural Significance of Pineapple in Desserts
Pineapple has a rich cultural history, especially in desserts. Originating from South America, it was introduced to Europe in the 16th century, quickly becoming a symbol of luxury and hospitality. The fruit’s unique appearance and sweet flavor have made it a favorite in various culinary traditions around the world.
In many cultures, pineapple represents warmth and welcome. Serving a dish with pineapple often conveys generosity and kindness. This makes your Tropical Bliss dessert not only a delightful treat but also a meaningful addition to any gathering, inviting your loved ones to share in the joy of good food and good company.
Conclusion
In summary, the Tropical Bliss: No Bake Pineapple Cream Dessert is a delightful fusion of flavors and textures that captures the essence of tropical indulgence. Its easy preparation and refreshing taste make it a perfect choice for any occasion, from casual family dinners to festive gatherings with friends.
As you prepare this dessert at home, remember the importance of each layer, the magic of chilling, and the beauty of presentation. Whether you opt for individual servings or a large dish to share, this dessert promises to impress and satisfy.
Encouraging you to try your hand at this recipe, imagine the smiles and joy it will bring to those you share it with. Embrace the spirit of hospitality that pineapple embodies, and enjoy the process of creating a dessert that not only tastes heavenly but also brings people together. So gather your ingredients, follow the steps, and embark on a tropical culinary adventure that will leave lasting memories.