Introduction
Katsu, a beloved dish in Japanese cuisine, has captured the hearts and taste buds of food enthusiasts worldwide. This delectable meal, often consisting of breaded and deep-fried meat, is a staple in Japanese households and restaurants alike. The word “Katsu” is short for “katsuretsu,” which means cutlet in Japanese, and it typically features a protein coated in a crunchy layer of panko breadcrumbs. With its crispy texture, vibrant colors, and an explosion of flavors, Katsu has become a favorite choice for those seeking comfort food with a twist.
In this article, we will delve into the delightful world of Crunchy Katsu Delights in a Bowl. This recipe not only highlights the classic Katsu but also elevates it by transforming it into a hearty bowl meal. Expect to enjoy the satisfying crunch of perfectly fried pork, the freshness of crisp vegetables, and the savory sweetness of Tonkatsu sauce, all served over a bed of fluffy rice. Whether you’re a seasoned chef or a beginner in the kitchen, this guide provides a detailed recipe and invaluable tips to help you create the perfect Katsu Bowls that will impress family and friends alike.
Understanding Katsu
Definition and History of Katsu in Japanese Cuisine
At its core, Katsu is a breaded cutlet that has become synonymous with comfort food in Japan. The dish’s origins can be traced back to the introduction of Western cuisine to Japan during the Meiji era (1868-1912). Influenced by the European style of cooking, Katsu was born as a way to adapt traditional Japanese ingredients and flavors into a new culinary context. The most common varieties of Katsu include Tonkatsu (pork), Chicken Katsu (chicken), and even vegetarian options like Kabocha Katsu (pumpkin).
Tonkatsu, often served with shredded cabbage and a tangy sauce, quickly gained popularity and has become a menu staple in many Japanese restaurants. Katsu is not only enjoyed as a main dish but also as a filling for sandwiches, a topping for rice bowls, or even served with curry. This versatility has made Katsu a cherished dish across generations, solidifying its place in the pantheon of Japanese culinary traditions.
Variations of Katsu: Pork, Chicken, and Vegetarian Options
While Tonkatsu remains the most popular form of Katsu, the dish’s adaptability allows for various proteins to take center stage. Chicken Katsu offers a lighter alternative, featuring breaded and fried chicken cutlets that are just as crispy and flavorful as their pork counterpart. For those seeking a vegetarian option, Katsu can also be made with eggplant, tofu, or even sweet potatoes, all of which can be breaded and fried to achieve that satisfying crunch.
Each variation brings its unique flavor and texture to the table, making Katsu a dish that can cater to diverse dietary preferences. Regardless of the protein chosen, the crunchiness of the panko breadcrumbs remains a signature element that defines the Katsu experience.
The Significance of Tonkatsu Sauce and Its Flavor Profile
No Katsu would be complete without its iconic companion: Tonkatsu sauce. This rich, savory sauce is a blend of Worcestershire sauce, ketchup, soy sauce, and various spices, resulting in a complex flavor profile that perfectly complements the crunchy texture of the Katsu. Its sweet, tangy, and umami notes enhance the overall dish, making each bite a delightful experience.
Tonkatsu sauce is not only essential for traditional Katsu but can also be used creatively in other dishes, such as marinades, dressings, or dipping sauces. Understanding the significance of this sauce helps elevate the Katsu experience, allowing home cooks to appreciate the intricate balance of flavors that makes the dish so beloved.
Ingredients Breakdown
Creating the perfect Crunchy Katsu Delights in a Bowl requires careful selection of ingredients. Each component plays a crucial role in achieving the desired flavor and texture. Here’s a detailed breakdown of the essential ingredients you’ll need for this recipe:
Boneless Pork Chops: Choosing the Right Cut
The star of our Katsu Bowl is the boneless pork chop. When selecting pork chops, look for cuts that are well-marbled, as the fat helps keep the meat juicy and flavorful during cooking. A center-cut loin chop is an excellent choice, providing the right balance of tenderness and flavor. For those looking for a leaner option, pork tenderloin can also be used, though it may require careful cooking to avoid drying out.
The Role of Flour, Egg, and Panko Breadcrumbs in Achieving Crunchiness
To achieve that signature crunch that Katsu is known for, the breading process is critical. The three main components of the breading station are:
1. All-Purpose Flour: Dusting the pork chops in flour helps the egg adhere better and creates a barrier that locks in moisture during frying.
2. Egg: Beaten eggs serve as the binding agent that coats the pork chops in a layer of moisture. This layer not only adds richness but also helps the panko breadcrumbs stick.
3. Panko Breadcrumbs: The hero of the breading process, panko breadcrumbs are coarser than regular breadcrumbs, providing an extra crunch. They are light and airy, which allows them to fry up beautifully, creating a crispy crust that contrasts perfectly with the tender meat inside.
Importance of Fresh Vegetables: Cabbage, Carrots, and Green Onions
A well-rounded Katsu Bowl is not just about the meat; fresh vegetables play a vital role in adding flavor, texture, and nutritional value.
– Shredded Cabbage: Often served alongside Katsu, finely shredded cabbage adds a refreshing crunch and balances the richness of the fried pork. It’s a staple in many Katsu dishes and is typically served raw.
– Carrots: Thinly sliced or julienned carrots provide a splash of color and a hint of sweetness, enhancing the overall visual appeal of the bowl.
– Green Onions: Chopped green onions add a pop of freshness and mild onion flavor, bringing a delightful contrast to the crunchy Katsu.
The Flavor and Versatility of Tonkatsu Sauce
As mentioned earlier, Tonkatsu sauce is essential for drizzling over the Katsu, but its versatility extends beyond this dish. The sauce’s sweet and tangy flavor enhances the overall taste, making each bite more enjoyable. Additionally, Tonkatsu sauce can be used as a dipping sauce for other fried foods or even as a marinade for grilling meats.
Suggestions for Ingredient Substitutions and Variations
For those looking to customize their Crunchy Katsu Delights in a Bowl, there are plenty of substitutions and variations to consider:
– Protein Alternatives: For a healthier twist, consider using chicken or turkey instead of pork. For a vegetarian version, eggplant, zucchini, or firm tofu can be excellent substitutes.
– Gluten-Free Options: To make this dish gluten-free, substitute regular flour with rice flour and use gluten-free panko breadcrumbs.
– Vegetable Variations: Feel free to include other vegetables like bell peppers, radishes, or snap peas for added color and flavor.
Understanding the ingredients and their roles in the recipe is crucial for achieving the best results. Now that we’ve covered the essential components of our Katsu Bowls, let’s dive into the step-by-step guide for making this delicious dish.
Step-by-Step Guide to Making Katsu Bowls
Preparing the Pork: Techniques for Seasoning and Pounding for Uniform Cooking
The first step in creating your Crunchy Katsu Delights in a Bowl is to prepare the pork chops. Here’s how to do it effectively:
1. Season the Pork: Start by seasoning the boneless pork chops with salt and pepper on both sides. This step enhances the flavor of the meat and ensures that every bite is delicious.
2. Pound the Pork: For even cooking and to achieve that tender texture, use a meat mallet to pound the pork chops gently. Place the chops between two sheets of plastic wrap or parchment paper to prevent splatter. Aim for an even thickness of about half an inch. This technique not only tenderizes the meat but also helps it cook uniformly, resulting in juicy, perfectly cooked Katsu.
3. Set Up the Breading Station: Prepare your breading station by placing three shallow dishes side by side. In the first dish, add a generous amount of all-purpose flour. In the second dish, whisk together a couple of eggs until well combined. In the third dish, pour in the panko breadcrumbs. This setup will streamline the breading process, making it easier to coat the pork chops thoroughly.
4. Bread the Pork: Start by dredging each seasoned pork chop into the flour, coating both sides evenly. Shake off any excess flour before dipping the chop into the beaten egg, ensuring it’s fully coated. Finally, press the chop into the panko breadcrumbs, making sure to cover it thoroughly. This triple-layer breading ensures maximum crunchiness when fried.
5. Chill the Breaded Pork: For best results, place the breaded pork chops on a wire rack and refrigerate them for at least 30 minutes. This step helps the breading adhere better during frying, leading to a perfectly crispy exterior.
With the pork prepared, you’re now ready to move on to the frying process, which will transform your breaded chops into the crispy Katsu that will be the star of your bowl. Stay tuned for the next part of this article, where we’ll discuss the frying technique, assembling the bowls, and serving suggestions.
Breading the Pork: Tips for Setting Up an Efficient Breading Station
Creating a delicious Katsu starts with a well-organized breading station. This not only simplifies the process but also ensures that your Katsu comes out perfectly crispy every time. To set up an efficient breading station, gather the following essentials:
1. Three Shallow Dishes: Use one for flour, another for beaten eggs, and the third for panko breadcrumbs. The shallow dishes will help you coat the pork evenly without mess.
2. Seasoned Flour: In the first dish, combine all-purpose flour with salt, pepper, and any additional spices you prefer. This seasoned flour adds a depth of flavor to the Katsu.
3. Egg Wash: Beat a couple of eggs in the second dish, adding a tablespoon of water or milk to loosen it up. This mixture acts as an adhesive for the breadcrumbs.
4. Panko Breading: The third dish should be filled with panko breadcrumbs. For an extra twist, consider mixing in some finely grated Parmesan cheese or seasoning to enhance the flavor.
5. Dredging Process: Start by lightly coating each pork cutlet in the flour mixture, shaking off any excess. Next, dip it in the egg wash, ensuring it’s fully coated. Finally, press the cutlet into the panko breadcrumbs, ensuring an even layer. This method creates the perfect crunchy coating that Katsu is known for.
Frying Techniques: Maintaining Oil Temperature for Perfect Crispiness
Frying Katsu requires precision, particularly in maintaining the temperature of the oil. Follow these tips to achieve that golden, crispy exterior:
– Choosing the Right Oil: Use an oil with a high smoke point, such as vegetable, canola, or peanut oil. These oils withstand high temperatures without burning.
– Temperature Check: Heat the oil in a deep skillet or frying pan to about 350°F (175°C). You can test the oil’s readiness by dropping a small piece of bread into the oil; if it sizzles and browns quickly, it’s ready for frying.
– Fry in Batches: To avoid overcrowding the pan, fry the Katsu in small batches. This helps maintain the oil temperature and allows for even cooking. A good rule of thumb is to fry no more than two or three cutlets at a time, depending on their size.
– Turning and Timing: Fry each cutlet for about 3-4 minutes on each side or until they are golden brown. Use tongs to gently turn them, avoiding the urge to poke or move them around too much, as this can disrupt the crust.
– Draining Excess Oil: Once cooked, transfer the Katsu to a wire rack or plate lined with paper towels to absorb excess oil. This step keeps the Katsu crispy and prevents sogginess.
Slicing and Presentation: How to Best Present the Katsu for Visual Appeal
Presentation is key when serving Katsu in a bowl. Here are some tips to ensure your dish looks as good as it tastes:
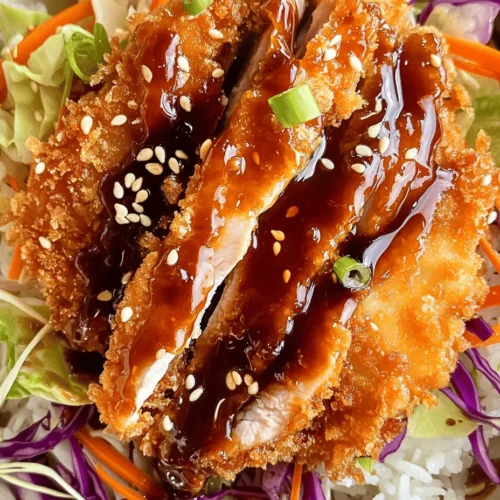
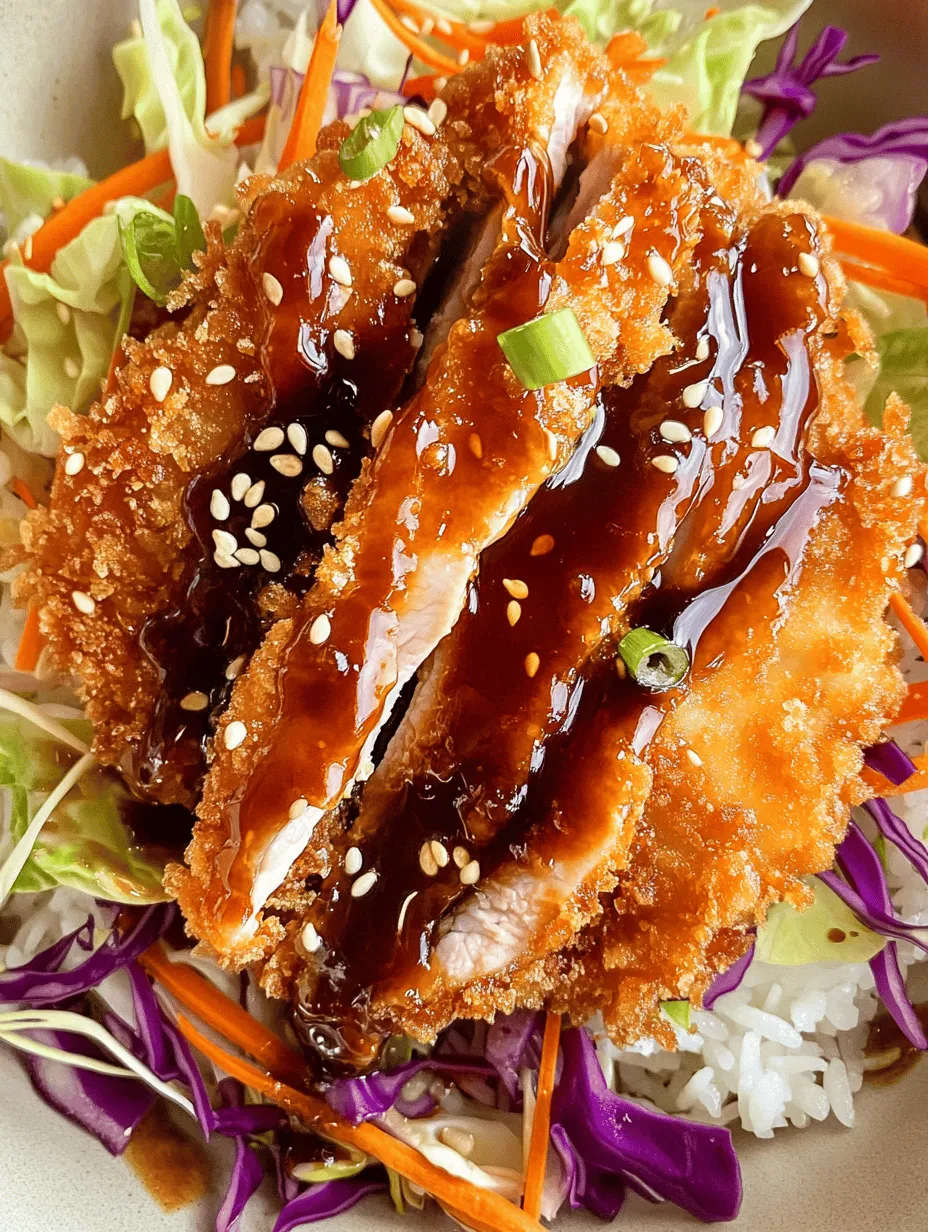
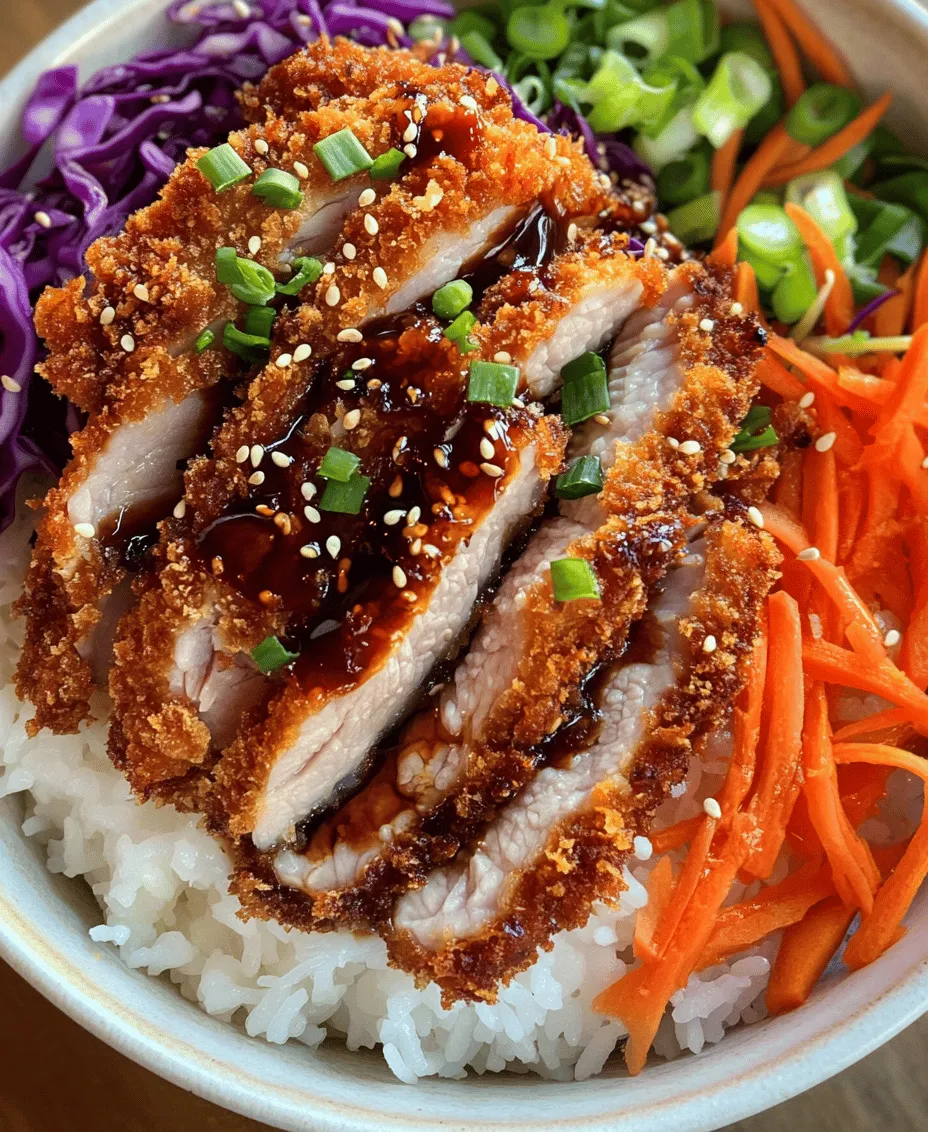
– Slicing Technique: Allow the Katsu to rest for a few minutes after frying. This helps retain its juices. Use a sharp knife to slice the Katsu into strips, approximately ½-inch thick. Angled cuts can add a touch of flair.
– Layering the Bowl: Start with a base of fluffy Japanese rice or your choice of grain. Arrange the sliced Katsu on top, slightly overlapping the pieces for an appealing look.
– Adding Color: Incorporate vibrant vegetables like sliced cucumbers, shredded carrots, and vibrant greens. These not only enhance the visual appeal but also add nutritional value.
Assembling the Katsu Bowl
With all the components prepared, it’s time to assemble your Katsu Bowl.
Layering the Ingredients: Importance of Balance in Flavors and Textures
The key to a delicious Katsu Bowl lies in balancing flavors and textures. Begin with a layer of rice, creating a hearty base. Next, add your Katsu slices, allowing their crunchiness to shine. Follow with a selection of fresh vegetables, such as:
– Cabbage: Finely shredded for crunch.
– Avocado: Creamy slices for richness.
– Radishes: For a peppery bite.
Finally, drizzle a generous amount of savory tonkatsu sauce over the top, which adds a sweet and tangy flavor that complements the Katsu beautifully.
Creative Serving Suggestions: Variations on the Classic Bowl
While the classic Katsu Bowl is delicious on its own, you can easily customize it to suit your taste preferences. Here are a few creative variations:
– Curry Katsu Bowl: Add a scoop of Japanese curry alongside your Katsu and rice for a comforting twist.
– Spicy Katsu Bowl: Incorporate a spicy mayo or sriracha for those who enjoy a little heat.
– Vegetarian Option: Substitute the pork with eggplant or tofu, breaded and fried in the same manner to create a satisfying vegetarian Katsu Bowl.
Garnishing Techniques: How to Elevate Presentation with Sesame Seeds and Green Onions
Garnishing is the final touch that elevates your Katsu Bowl from ordinary to extraordinary. Consider these garnishing techniques:
– Sesame Seeds: Sprinkle toasted sesame seeds over the Katsu for a nutty flavor and an elegant touch.
– Green Onions: Finely chop green onions and scatter them over the dish for freshness and color.
– Pickled Ginger: Include a small portion of pickled ginger on the side for a tangy contrast to the richness of the Katsu.
Nutritional Insights
Understanding the nutritional profile of your Katsu Bowl can help you make informed choices about your meal.
Overview of the Nutritional Profile of Katsu Bowls
A typical Katsu Bowl provides a balanced mix of protein, carbohydrates, and essential fats. Pork cutlets are a great source of protein, while the rice serves as a carbohydrate base. Depending on the vegetables you choose, you can easily enhance the fiber and vitamin content of the dish.
Benefits of Including Fresh Vegetables in the Dish
Adding a variety of fresh vegetables not only boosts the nutritional value but also enhances the flavor profile. Vegetables like carrots and cucumbers add crunch and freshness, while leafy greens provide essential vitamins and minerals, making your meal more wholesome.
Discussion on Portion Sizes and Dietary Considerations
Portion control is important, especially when enjoying a hearty dish like Katsu. Aim for a balance of protein, carbs, and vegetables. For those with dietary restrictions or preferences, consider the following substitutions:
– Gluten-Free: Use gluten-free breadcrumbs or crushed rice crackers for breading.
– Lower-Carb Option: Substitute rice with cauliflower rice or a salad base.
Cultural Significance of Katsu in Meals
Katsu is more than just a dish; it holds cultural significance in Japanese cuisine.
The Role of Katsu in Japanese Home Cooking and Celebrations
Katsu is often prepared at home as a comforting meal, enjoyed by families on special occasions. It is a popular choice for celebrations, symbolizing warmth and togetherness. The process of making Katsu can be a family affair, with each member contributing to the preparation.
How Katsu Bowls Are Enjoyed in Modern Dining Experiences
In contemporary dining, Katsu Bowls have gained popularity as a quick yet satisfying meal option. Many restaurants offer gourmet versions of Katsu Bowls, showcasing various ingredients and flavors, catering to diverse palates.
Exploring the Fusion of Katsu with Other Global Cuisines
Katsu has also found its way into fusion cuisine, blending with flavors from around the world. From Katsu tacos to Katsu sandwiches, the versatility of this dish allows it to be enjoyed in many unique forms, making it a beloved choice for food enthusiasts.
Conclusion
Crunchy Katsu Delights in a Bowl offer a delightful combination of crispy, savory flavors, balanced with fresh ingredients and vibrant colors. Whether you stick to the traditional recipe or explore creative variations, this dish is sure to please your taste buds.
We encourage you to try this recipe, personalizing it to suit your preferences. Cooking is not just about following instructions; it’s about creativity and sharing joy with others. Embrace the process, and enjoy every bite of your Katsu Bowl, whether it’s a quiet dinner at home or a festive gathering with friends and family. Happy cooking!